BunsenLabs tryout with live dvd/usb
- BunsenLabs tryout with live dvd/usb
BunsenLabs tryout with live dvd/usb
This doc is a step-by-step guide to using a bootable linux distro to try it out, just to see if you like it (without installing anything on your computer).
This is not an installation guide (maybe an addendum will come later), which would definitely would change your computer permanently.
This guide was created for my mom (who is totally unfamiliar with linux), but I will try to make the instructions generally useful for anyone who wants to squeeze some more life out of an older laptop.
before you start
A few things you might need:
- The name & password for your wireless access point, if using WLAN
- Zoom login credentials, if installing Zoom
why BunsenLabs?
There are a bunch of listicles out there, if you search “best distro for old laptops”, “user-friendly distro for users transitioning from windows”, or similar, BunsenLabs has a pretty great reputation among those kinds of lists, so it seemed a good first choice to try out.
Personally, I still have a 12? 14? year old thinkpad x1 (gen2) with only 4 gb ram, and know from experience it can’t handle a gnome desktop, but it works fine for my needs with fluxbox.
Still, debian + fluxbox requires a lot of hands-on setup & maintenance that I don’t want to subject my mom to, ideally I would like a distro that uses a lightweight window manager (BunsenLabs uses openbox, not fluxbox, which does seem to need a little less up-front menu maintenance and so on), but which also provides windows-like ui components.
BunsenLabs looks promising!
prepare the install media
(Mom, skip this, I already sent you the dvd)
- head over to https://www.bunsenlabs.org/installation.html & download the iso
- burn to the desired installation/live media
- when creating a bootable usb stick, I like rufus
- I happen to be burning a dvd-r from windows 11, right clicking on the iso in windows explorer brings up a “burn to disc” menu option (there was no “create a bootable disc” toggle like in days of yore, but it booted fine)
At this point, you can try it out, insert the dvd into the drive or the usb stick into the port, and restart your computer. unless you’ve done this before, it is unlikely to work. if it just boots you straight back into windows, continue to the next section.
restart into your bios
Most pc hardware ships configured to boot directly into windows, we want to adjust it so that if a bootable dvd/usb is found on the system, it will choose to boot into that instead.
The following screenshots were created on a thinkpad x1, your bios will look a bit different, but in general, the process of looking for an option like “boot order”, modifying it, saving & restarting is the same across every bios i’ve ever seen.
To access the bios on a thinkpad, you press the F1 key during restart, on my old Dell I think it was F12, different manufacturers require different keypresses to get into the bios during boot, you can refer to the article at:
BIOS access keys @ Tom’s Hardware
or your manufacturer’s website, for example:
Dell support article about accessing the BIOS
adjusting the boot order in bios
Once you boot into your bios there will be some kind of welcome/menu screen. As
mentioned, the high-level description of our objective is to find an option to
edit the boot order on startup, so let’s start by entering the Startup submenu:
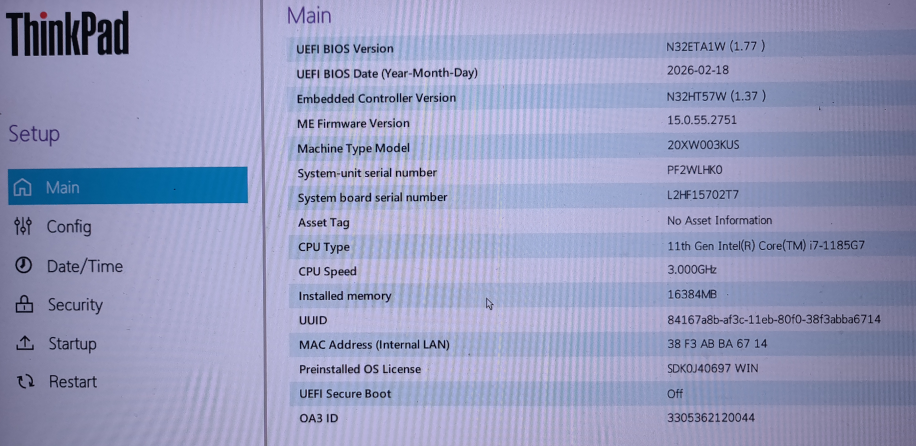
(apologies for some of these cellphone-style screenshots, i did this in a bit of a hurry)
At the very top of the Startup menu, I’ve circled a Boot option, it
might say “boot order”, “boot devices”, somehitng like that:
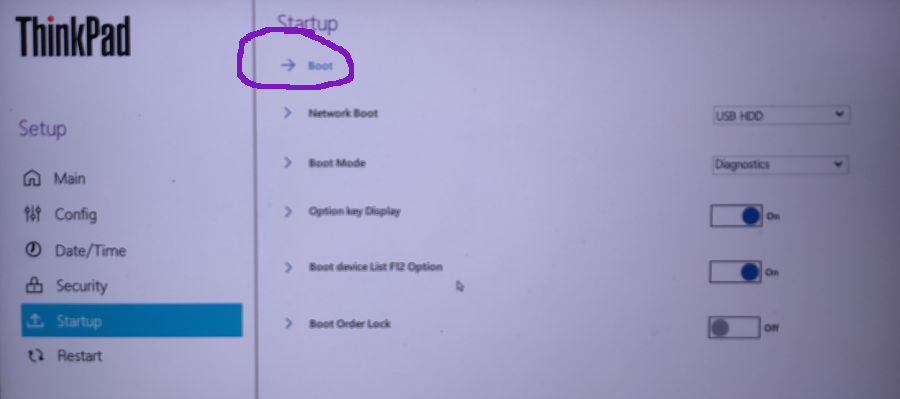
This example screen looks like it has an option to choose the boot device
interactively at boot time via the F12 key – maybe a lot of modern BIOSes have
this option (it’s been at least a decade since I regularly set up dual-boot
systems & such) – still, I am targeting old hardware here, and let’s assume we
have to do it the old-fashioned way.
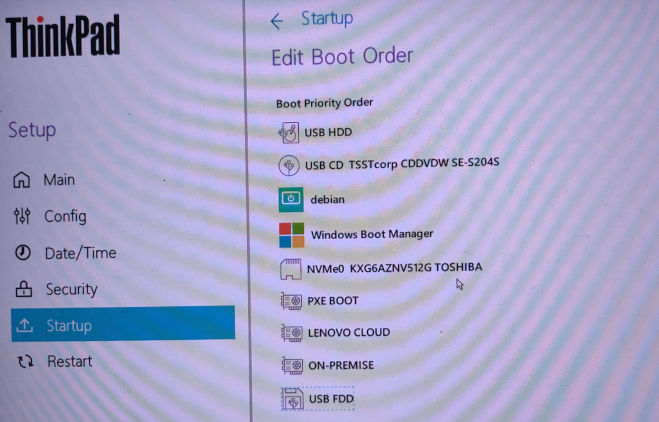
Finally the Edit Boot Order screen. The keys/mechanisms to change the
order will not be the same for all BIOSes, but there should be a menu spelling
out the options at the bottom of the screen, for me I had to use the arrow
keys to highlight the entry I wanted to modify, and then use F5/F6 to move
that item up or down the list.
This laptop already dual-boots into Linux, so you probably won’t have anything
like my “debian” option, and your USB/DVD drives will probably have different
names, but I recognize “USB CD TSSTcorp CDDVDW etc..etc..” as my external CD/DVD
drive, and “USB HDD” is clearly how a removeable USB stick would show up, so
we want to move those above “Windows Boot Manager”:
Once the order looks good, we can save & reboot.
Make sure the BunsenLabs DVD is in the drive, or USB stick is in the port before continuing.
Again, there should be a menu at the bottom of the screen. For me I think it was F10 & the option was called “Save & Quit” (or “Save & Restart”, or something like that).
If you are unsure that you didn’t mess something up, it’s probably better to cancel & restart, and maybe ask for help (I intend to be on the phone with Mom when she does this bit, for sure). If you feel confident, go ahead and Save & Restart.
Note, you don’t have to change the boot order every time you want to use the live-media disc/usbstick, only the first time
reboot into BunsenLabs
Particularly if you are booting from an external DVD drive like I am, the restart may take awhile, your drive may make a lot of noise and spin like crazy, give it time, it will hopefully get there.
It’s a good time to note, the point of this exercise is very much just trying out linux to decide if it’s something you can live/work with, from a useabilty perspective. The performance while running from a live DVD or USB stick is going to sometimes be a struggle, and you should not use this experience to judge Linux is too slow or anything like that, I assure you this particular version of linux will be faster than any version of Windows if installed to disk.
What happens when running a live-from-media OS is: the OS (Linux), loads into memory, and has to swap things in-and-out of memory, reading from very slow media when it needs to read something. Usually once it is up and running, you can configure the internet connection, and use it almost like normal for periods of time, but you will definitely notice a lot of disc-gnashing the first time you open a web browser, or other major applications. As an experiment, we’ll go ahead and install Zoom below, which will also install directly into memory.
BunsenLabs welcome screen
Once the reboot-from-bios finally loads, and most of that disc-gnashing
settles down, you should be presented with a welcome screen, and a few options:
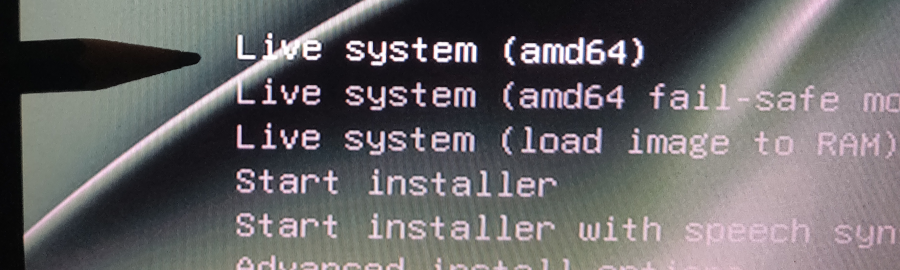
DO NOT CHOOSE “Start Installer”
Start Installer is what you would choose if you wanted to go ahead & install BunsenLabs linux to disk, without trying it first. We only want to test drive it.
I chose the first option, Live System (amd64), for the creation of this doc. Live System (load image to RAM) is an interesting option as well, depending on how much RAM you have. I assume that is an option to “read all 2GB of the DVD into RAM & then launch the OS, alleviating future slow reads from that media. For now, let’s continue with the first option (indicated in my horrible screenshot by pointing to it with a pencil).
welcome to the default desktop
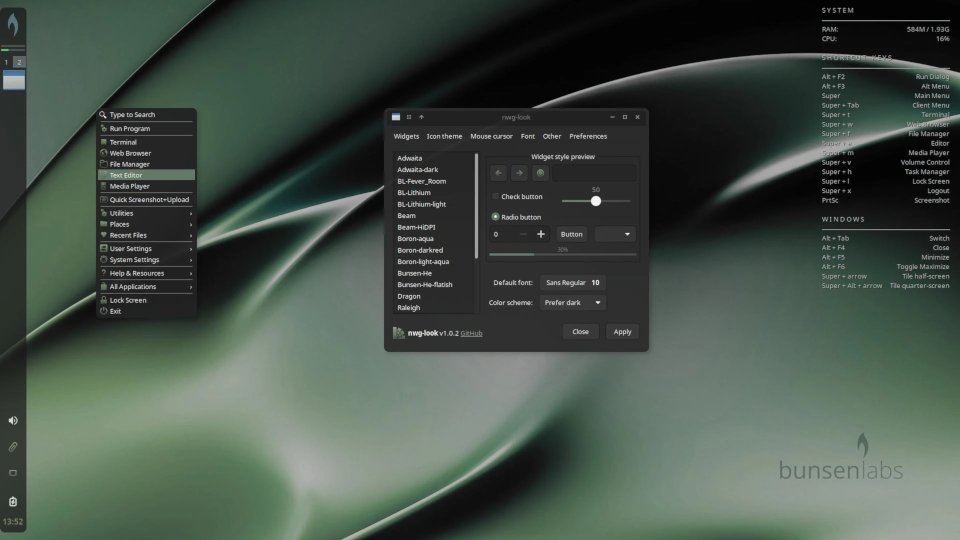
(this image looks better because it’s actually a proper screengrab that i nicked from bunsenlabs.org)
There are a few changes that are immediately apparent if coming from Windows (the taskbar is on the side, menus don’t work exactly the same way), but we can see it’s a recognizeable desktop. We see the desktop menu in action there (with Text Editor highlighted), and some configuration window is open, as an example of what dialogs look like. It looks like some kind of theme config dialog.
One thing to be aware of, with Linux everything is configurable, you’re not locked in to anything you don’t like, if you’re not crazy about the theme, never fear, there are a bunch of them to choose from. There’s a sort of gallery of available themes @ bunsenlabs.org
I think it’s better to just experience the differences as we try to do a few things, rather than try to itemize the differences, so let’s dive in.
connect to the internet
Try clicking on the desktop to open the desktop menu, and select Web Browser
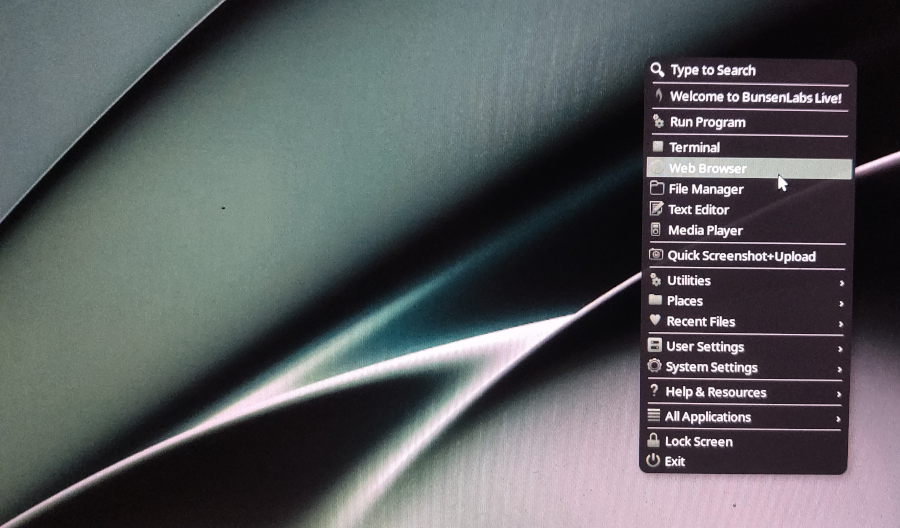
If you have a wired ethernet connection, you are probably all set. For me, I
have no connection and Firefox tells me: Server not found. If you have to
connect to a wireless network, follow along!
I find the icon to open the Wi-Fi Networks dialog to be a little
difficult to see, even with my mouse pointer positioned on top of it, so I’ve
circled it:
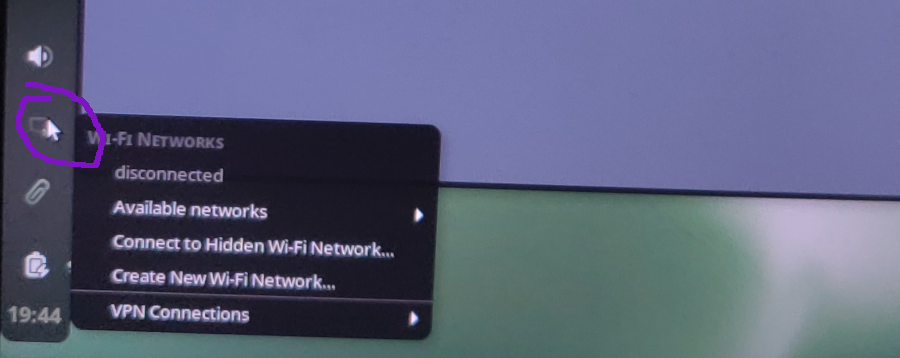
From there, hover over Available Networks, locate and select your router,
and you will be prompted for your router’s username & password.
You should see a Connection Established notification pop up in the upper right corner:
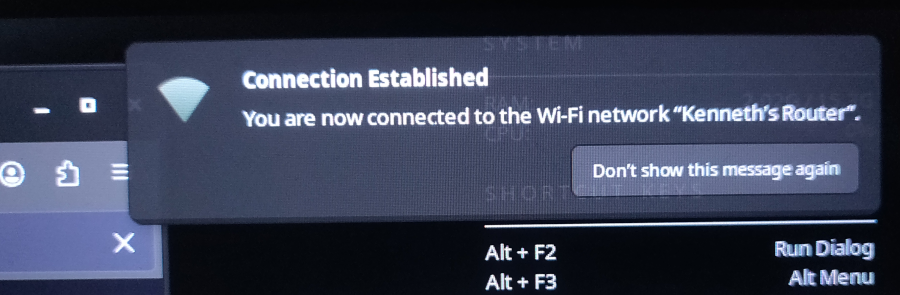
(I entered the wrong password at first and had to poke around that same Wi-Fi
Networks dialog for awhile before I found how to edit existing connections)
Verify Firefox works before continuing.
install zoom
BunsenLabs is based on Debian Linux, and as such has access to tons of Free Software packages, from Libre Office to The Gimp for image editing, really, the introduction to available software on Linux is so vast it requires a separate article.
One thing, though, that is important for my Mom’s use case, is Zoom, we Zoom every week, and I imagine she sometimes Zooms with her grandchildren, maybe her niece in Germany, so being able to install Zoom is important for this context.
download zoom installer
Now that Firefox is working, navigate to https://zoom.us and log in.
I’m pretty sure you can’t even get to a download screen without logging in, I
couldn’t find it. Once logged in, go to the Resources tab, and there should
be a Download Zoom option:
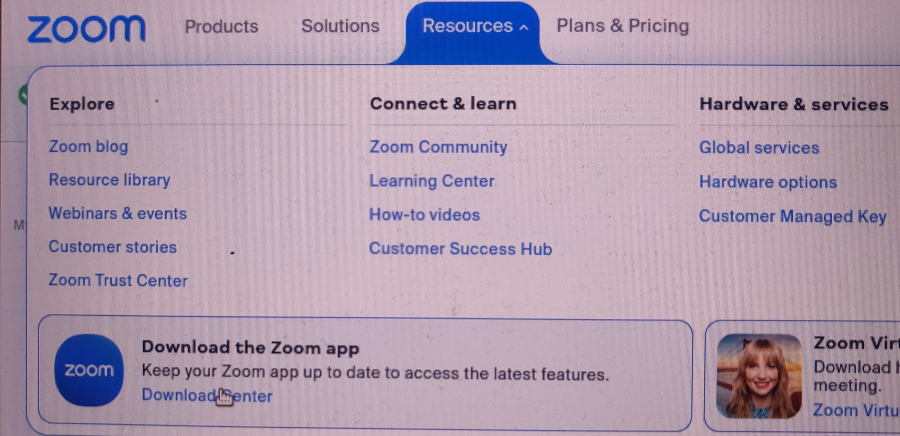
It will detect you are on linux and give you an option to Select Linux Type,
as noted, BunsenLabs is based on Debian, so choose Debian:
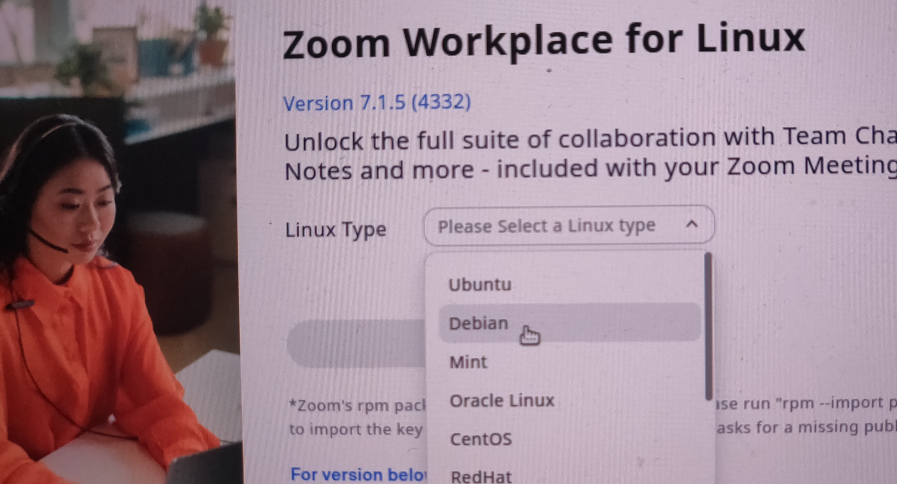
It will then ask for your OS architecture, it is almost certainly 64 bit,
select that and push Download
install zoom & dependencies
We’re going to open a terminal and run a couple of commands, there probably is a graphical way to do this, but this is the way I know, and it should be easy.
Open a terminal the same way we opened a web browser before: click on the
desktop, and select Terminal:
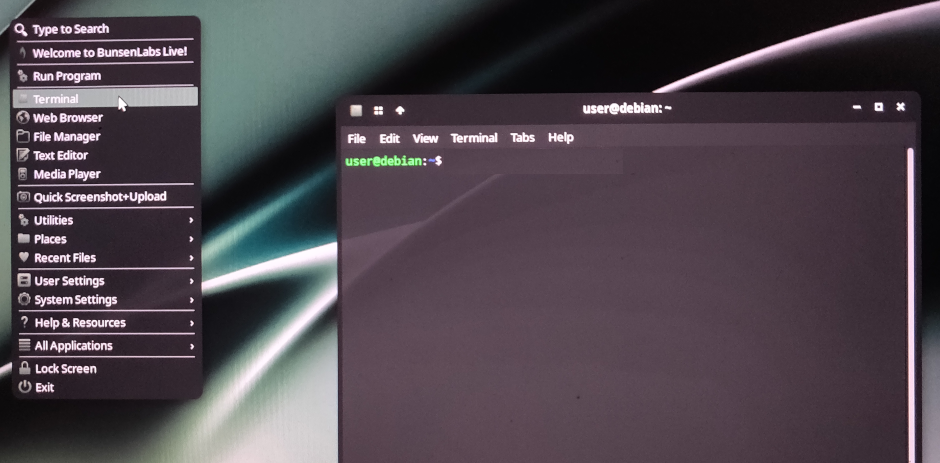
There are a few things about using a terminal that I don’t think you need to
understand necessarily, but I don’t want you to be confused about:
- the command line starts with
user@debianbecause that is your login for this session, anyone using the BunsenLabs live dvd/usb linux distro has that same login (the format is username +@+ hostname, normally everyone would have their own login) - Normally when you install a Debian package, it automatically installs all of the other packages it needs. I suppose because there is such a variety of debian-derived systems, Zoom has given up on automatically linking to those dependencies, so we have to do that ourselves
In my case, I went through some trial & error, but I think you should only have to run two commands:
First, to install the missing dependencies:

And the same for copy-pasting:
sudo apt install ibus libxcb-cursor0 libxcb-xtest0It doesn’t really matter what those packages are, but this is an example of
installing stuff from the linux community, there is no need to download stuff
separately, it is all just an apt install command away.
Second, to install Zoom itself:

And the same for copy-pasting:
sudo dpkg -i ~/Downloads/zoom_amd64.debopen zoom
In case you can’t see the desktop at some point, you can also access the menu
from the flame-looking thing in the upper left corner:
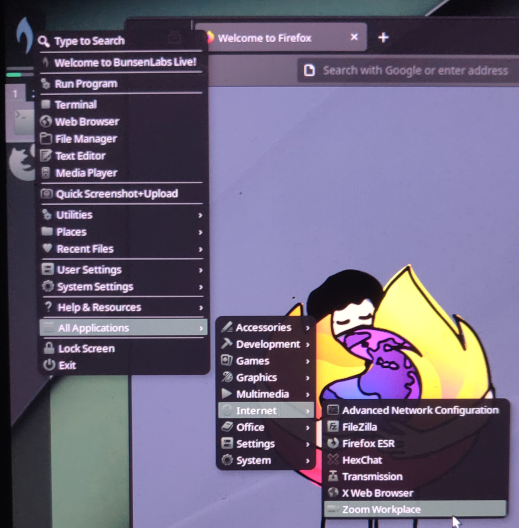
As you can see, installed stuff is organized pretty logically, just navigate
All Applications -> Internet -> Zoom Workplace to open Zoom.
Install some Games!
Next time, we will install some games! What’s a computer without games?